
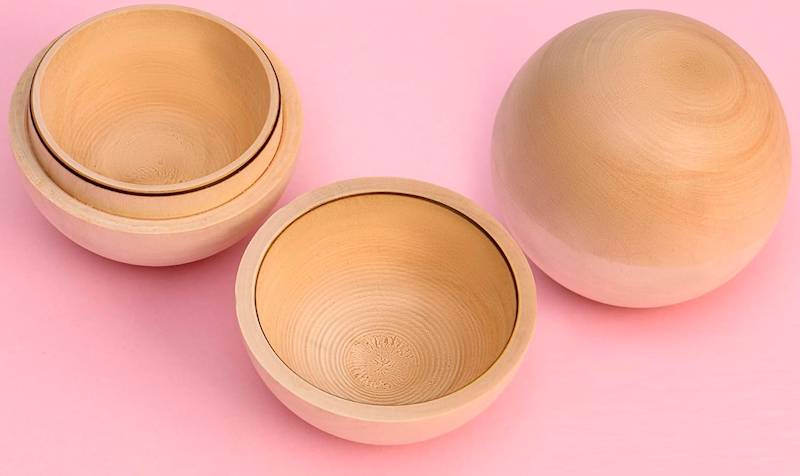
HOLLOW WOOD SPHERES
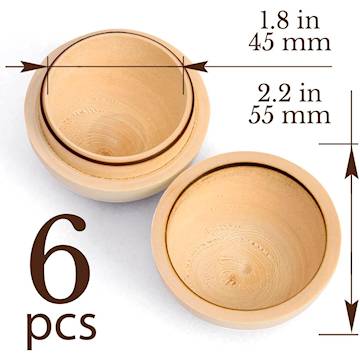
HOLLOW WOOD BALLS
- Units: 6
- Diameter: 2.2″ (55mm)

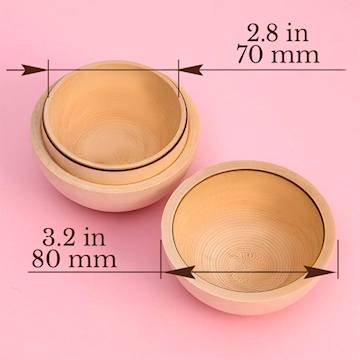
HOLLOW WOOD SPHERES
- Units: 4
- Diameter: 2.8″ (71 mm)
HOLLOW WOODEN BALLS
- Units: 3
- Diameter: 3.2″ (80mm)

HOLLOW WOODEN SPHERES
- Units: 5
- Diameter: 3.5″ (90 mm)
WHAT IS A HOLLOW BALL?
It is a ball with a hollow interior. When made of wood, they can be crafted from different types of wood such as beech, cedar, birch, etc.
WHAT ARE HOLLOW WOOD BALLS USED FOR?
Their use is mainly geared towards DIY projects. They are very easy to paint, varnish, or engrave, and can be used to make jewelry boxes, decorative boxes of all kinds, or as home decor.
HOW TO MAKE HOLLOW WOOD BALLS?
Creating hollow wooden balls requires the use of a small workshop with some tools. While it is not a complicated process, some experience in handling these tools is necessary. The main steps are summarized below:
- First, gather all the necessary tools. You will need your turning tools and a pair of cup centers that will fit on your lathe’s headstock and tailstock.
- Select a piece of dry mesquite wood. It’s important that the wood is dry to ensure it turns well and doesn’t warp.
- Using the octagon method, mark the wood with the necessary measurements. This involves calculating and marking the distances for the octagon’s sides and corners on the wood.
- Create shallow tenons at each end of the wood. These tenons will help you mount the wood securely on the lathe.
- Cut the wood into two pieces. This will form the two halves of your hollow sphere.
- Mount the shorter piece of wood in the chuck of your lathe. This piece will become the female side of the sphere.
- Mark the inner diameter of the sphere on the end of the wood. Draw a circle with a diameter of about two inches.
- Hollow out the interior of the wood using a spindle gouge and a round nose scraper. This will create the hollow space inside the sphere.
- Sand the interior of the hollowed piece. Use a combination of beeswax and mineral oil as a sanding medium, starting with 120 grit sandpaper and progressing to 240 grit.
- Cut a mortise into the hollowed piece with a box scraper. Ensure that the mortise is straight and not tapered.
- Fit the tenon of the second piece of wood to the mortise of the first piece. Adjust as necessary to ensure a snug fit.
- Hollow out the interior of the second piece of wood, just like you did with the first piece. Make sure to account for the depth of the tenon so that both halves are balanced.
- Sand the interior of the second piece, again using beeswax and mineral oil from 120 to 240 grit sandpaper.
- Assemble the two halves of the sphere by fitting the tenon into the mortise. Ensure the joint is tight and secure.
- Using the octagon method, begin rounding the assembled sphere. This involves cutting the wood at 45-degree angles and then rounding off the edges to form a rough sphere.
- Sand the exterior of the sphere, starting with 80 grit sandpaper and progressing to finer grits. Use beeswax and mineral oil to help with the sanding process.
- Finally, apply a finishing layer of beeswax and mineral oil to the sanded sphere. This will give it a smooth, polished finish.
In this video, you can visually see the process explained above.